

👉 Try MindtrixAI’s Free LLMs.txt Generator, AI Humanizer Tool & AI Paraphrasing Tool Now →
If you searched How to Remove CapCut Watermark, you probably want the fastest clean fix, not a bunch of random hacks that waste your time. Here’s the truth right away: How to Remove CapCut Watermark depends on where the watermark is coming from.
If it’s just the CapCut ending clip, delete it from the timeline. If it’s inside a template, check the layers and branded assets.
If the watermark is actually baked into the video frame, then go to Video > Basic > AI Remove, choose the Brush tool, paint over the watermark, and click Remove. In CapCut’s export help, the company explains that watermark issues usually come from a default ending clip, a template element, or branded assets, not one universal export setting.
- Watermark at the end → delete the CapCut ending clip.
- Template watermark → remove the ending clip, then inspect every layer and replace branded assets.
- Watermark inside the video → use AI Remove, crop, or cover it only if it’s your own or authorized content.
- Still seeing a watermark after paying → it’s often a template or asset issue, not necessarily a subscription issue.
How to Remove CapCut Watermark: Choose Your Situation First
Before you try anything, figure out which situation you’re actually in. This is the step most users skip, and that’s exactly why they waste time. This isn’t one watermark problem, it’s three different ones.

| Situation | Best First Fix |
|---|---|
| Watermark at the end of the video | Delete the CapCut ending clip |
| Template watermark | Check layers, hidden overlays, and branded assets |
| Watermark inside the video frame | Use AI Remove or crop/cover if needed |
- How to Remove CapCut Watermark from the Ending Clip: Best for default CapCut outro at the end of your video.
- How to Remove CapCut Watermark from Templates: Fix hidden branding inside template layers and assets.
- How to Remove CapCut Watermark from AI-Generated Labels and In-Frame Overlays: Use AI Remove or alternatives for watermarks inside the video frame.
- Advanced Techniques for Tougher CapCut Watermark Cases: Use fallback methods when basic fixes don’t solve the issue.
- How to Remove CapCut Watermark Without Losing Quality: Follow the safest order to keep your video quality intact.
Why This Guide Gives Better Value Than Most Results
This topic looks simple, but the search results are messy. Some explain the quick end-clip fix. Some mention templates. Some jump straight to AI tools.
What makes this guide stronger is the flow: it separates watermark types clearly, tells you which method to use first, covers template edge cases and paid-plan confusion, and only brings in fallback options when they actually make sense.
How to Remove CapCut Watermark from the Ending Clip
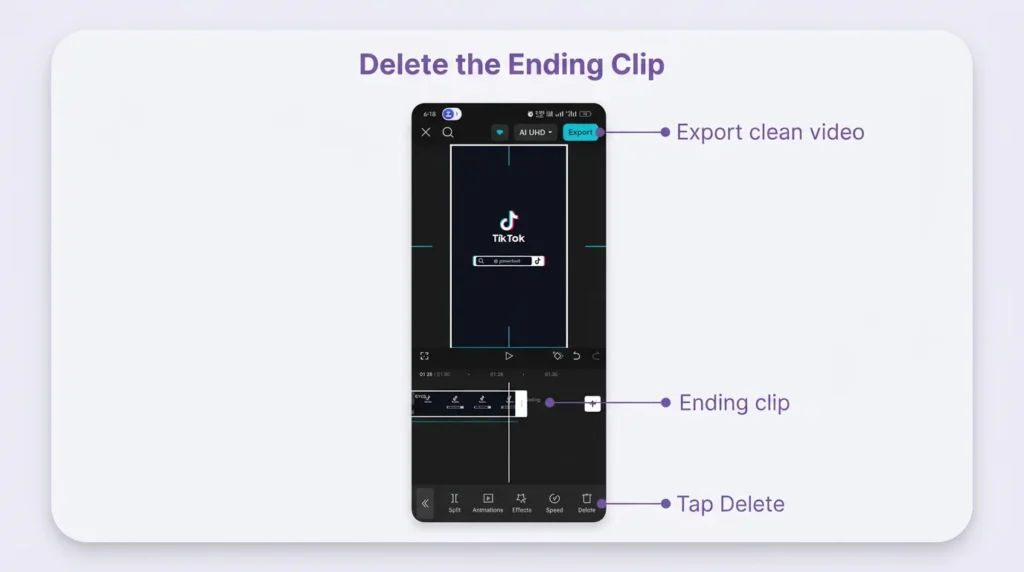
For a huge chunk of users, this is the whole problem. Across mobile, desktop, and web, CapCut’s official removal steps follow basically the same 6-step pattern: go to the end of the timeline, select the CapCut-branded ending clip, delete it, preview, and export again.
On Mobile
- Open the project.
- Swipe to the end of the timeline.
- Tap the CapCut ending clip.
- Press Delete.
- Preview once.
- Export.
On Desktop
- Open the project in CapCut desktop.
- Move to the last clip.
- Select the watermark/outro clip.
- Delete it.
- Recheck the tracks.
- Export again.
On Web
- Open the project in CapCut Online.
- Go to the end of the timeline.
- Delete the branded outro.
- Preview.
- Export.
You can also go for hiding or removing the watermark via CapCut’s export option. But if the issue is just the end clip, deleting it is still the cleaner move.
A helpful community tip from this CapCut thread is to turn off default ending in settings so future projects stop adding that branded outro automatically.
How to Remove CapCut Watermark from Templates
This is where things get trickier. The template watermark issues usually come from 2 common causes: a branded ending clip and watermark/logo elements embedded in the template layers. So yes, deleting the last clip helps, but sometimes it only solves half the problem.
Use This Template Workflow
- Delete the ending clip.
- Check every visible and hidden layer.
- Look for branded stickers, text, logos, or overlays.
- Replace branded assets if needed.
- Preview before export.
- If the same template keeps causing problems, rebuild it manually with your own media.
That last part matters. Using your original media is one of the cleanest ways to avoid template branding issues.

Extra Template Methods Worth Knowing
1) Avoid Watermark-Heavy Templates
If a template is known for branded exports, skip it. It sounds obvious, but it saves time.
2) Try the TikTok or Share Route Only as a Workaround
Some users report that sharing or exporting through a TikTok route can avoid watermark behavior in certain template cases. That can work in edge cases, but it’s a workaround, not something I’d trust as a long-term workflow.
3) Build Your Own Reusable Version
If you use the same style repeatedly, creating your own version with your own clips, transitions, and presets is usually more stable than relying on a template that keeps fighting you.
This pain point is real. In one CapCut subreddit complaint, a user said they paid for both monthly and annual plans and still couldn’t export template videos locally without a watermark. In a VideoEditing thread, a Pro user said the watermark disappeared only when sharing directly to TikTok.
Bottom line: templates hide branding in layers, not just the ending clip.
How to Remove CapCut Watermark from AI-Generated Labels and In-Frame Overlays
Now we’re in the scenario where the featured-snippet-style fix actually makes sense. If the watermark is inside the video frame, go to Video > Basic, open AI Remove, choose Brush, size it to the watermark, paint over the marked area, and click Remove.
On CapCut’s AI watermark remover page, the tool emphasizes 4 strengths: smart AI detection, precise brush selection, preserved quality, and smoother frame-by-frame cleanup.

Use this method when the watermark is baked into the frame, the footage is yours or you’re authorized to edit it, cropping would ruin the composition, and the mark is small enough for the AI to clean up naturally.
Other Useful In-Frame Methods
- Crop the Frame: If the watermark is near the edge, cropping can be faster than AI cleanup.
- Cover It with a Sticker, Shape, or Overlay: Not perfect, but fine for quick social content if you just need it out of sight fast.
- Export Selected Clips: Some users try exporting only the selected clips to bypass AI-generated watermark behavior. This is more workaround than official workflow, but it’s worth testing in edge cases.
- Separate Timeline Method: Another approach is to export the clip, start a new project, import that output, and export again. Sometimes it helps with stubborn AI-generated labels, sometimes it doesn’t.
CapCut also notes that the tool supports formats like MP4, MOV, and AVI on its watermark remover page, so format support usually isn’t the blocker here.
Bottom line: Use AI Remove only when the watermark is actually inside the footage, not when it’s sitting in the timeline waiting to be deleted.
Advanced Techniques for Tougher CapCut Watermark Cases
If the basic fixes don’t solve it, these are the advanced options worth considering, carefully.
Use Older CapCut Versions as a Fallback
Some creators use older CapCut builds because newer monetization changes can affect watermark behavior. This can help in edge cases, but it comes with trade-offs: fewer features, fewer fixes, and more instability.
Compare Paid Plan Behavior Before Assuming It Solves Everything
A lot of users assume upgrading automatically removes every watermark. Real-world complaints suggest that’s not always true, especially with templates and certain export flows. So if you’re paying, test on one short project first before assuming the problem is gone.
Switch to a Watermark-Free Editor if This Keeps Happening
If you keep running into template restrictions, branded assets, or plan confusion, switching editors may save you more time than endlessly troubleshooting. That’s especially true if you publish often.
How to Remove CapCut Watermark Without Losing Quality
If quality matters, use the least destructive method first. CapCut’s tool page says exports can be customized up to 8K resolution, but the method you choose still matters a lot. Some fixes preserve the original frame. Others alter it.
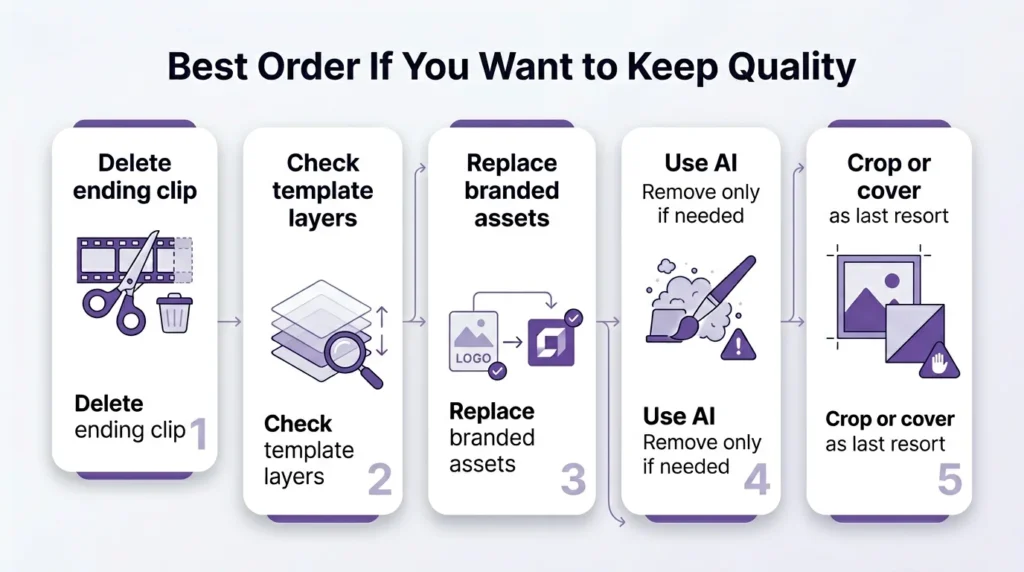
Best Order If You Care About Quality
- Delete the ending clip
- Remove or replace branded template elements
- Use AI Remove
- Crop only if the composition can handle it
- Cover with a graphic only when speed matters more than perfection
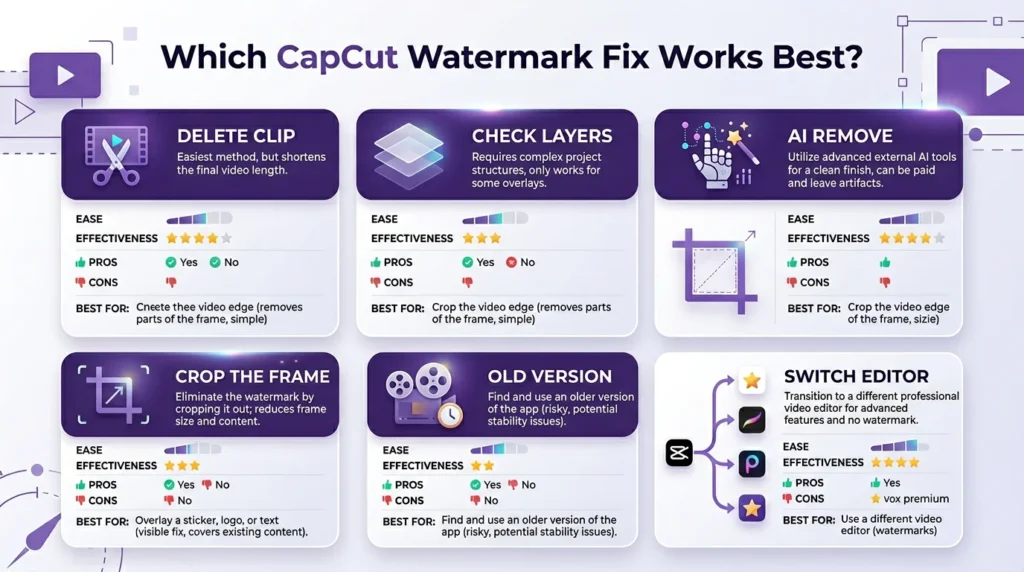
| How to Remove CapCut Watermark Method | Quality Impact | Best Use Case |
|---|---|---|
| Delete ending clip | None | Default CapCut outro |
| Remove branded template layer | None to very low | Template watermark issues |
| Replace branded asset | None to low | Stock/template attribution problems |
| AI Remove | Low to medium | In-frame watermark on your own footage |
| Crop frame | Medium | Edge watermark only |
| Cover with sticker/graphic | Medium | Quick social edits |
Comparison of Watermark Removal Methods in CapCut
This table is the practical decision guide most posts should have included from the start. CapCut’s official help relies on a 6-step cleanup workflow, while real-world creator workflows add template inspections, AI cleanup, and fallback methods when needed.
| Method | Difficulty | Time Required | Success Rate | Works With Templates | Best For | Platform Support |
|---|---|---|---|---|---|---|
| Delete ending clip | Easy | 10–30 sec | High | Sometimes | Standard CapCut outro at the end of the video | Mobile / Desktop / Web |
| Disable default ending in settings | Easy | 15–30 sec | High | No | Preventing the CapCut ending clip in future projects | Mostly Mobile |
| Inspect layers and remove hidden branding | Medium | 2–10 min | High | Yes | Template exports with hidden overlays, stickers, or logo elements | Mobile / Desktop / Web |
| Replace branded stock or template assets | Medium | 3–10 min | High | Yes | Projects using assets that still carry branding or attribution | Mobile / Desktop / Web |
| Build the video manually instead of using a template | Medium | 10–30 min | High | Yes | Repeated template watermark issues and a cleaner long-term workflow | Mobile / Desktop / Web |
| AI Remove (Brush tool) | Medium | 1–5 min | Medium | No | Watermarks already baked into the video frame | Mainly Desktop / Supported editor workflows |
| Crop frame | Easy | 30–60 sec | Medium | No | Edge-based watermarks that can be trimmed cleanly | Mobile / Desktop / Web |
| Cover watermark with sticker, shape, or overlay | Easy | 1–3 min | Medium | Sometimes | Fast social edits where perfect cleanup isn’t required | Mobile / Desktop / Web |
| Export selected clips | Medium | 2–5 min | Low to Medium | Sometimes | AI-generated watermark edge cases | Mostly Desktop |
| Separate timeline method | Medium | 3–8 min | Low to Medium | Sometimes | Stubborn AI-generated labels or export behavior | Desktop / Mobile |
| Share/export via TikTok route | Medium | 2–5 min | Low to Medium | Yes | Template-related edge cases where local export keeps branding | Mostly Mobile |
| Use an older CapCut version | Hard | 10–20 min | Low to Medium | Sometimes | Last-resort fallback when new builds change watermark behavior | Mobile / Desktop |
| Upgrade plan / paid export option | Easy | 1–3 min | Medium | Sometimes | Users testing whether paid export options reduce watermark limits | Mobile / Desktop |
| Switch to a watermark-free alternative editor | Medium | 15–60 min setup | High | N/A | Creators who want to avoid recurring CapCut watermark friction entirely | Depends on tool |
Expert Tips for How to Remove CapCut Watermark Faster
A few patterns keep showing up in official docs and real-world complaints.
- Turn off default ending if you keep creating new projects with the same branded outro, as users mention in this CapCut thread.
- If you use templates often, preview all layers, not just the main track.
- Export a short test before batch-producing a bunch of videos.
- If quality matters, always try delete/replace before AI remove/crop.
- If a template keeps causing repeated trouble, create your own reusable manual version instead.
- If you’re paying for a plan and still seeing a watermark, document the exact template and export path before contacting support.
MindtrixAI kept seeing the same pattern during review: users lose the most time when they assume the watermark is global instead of checking where it actually lives.
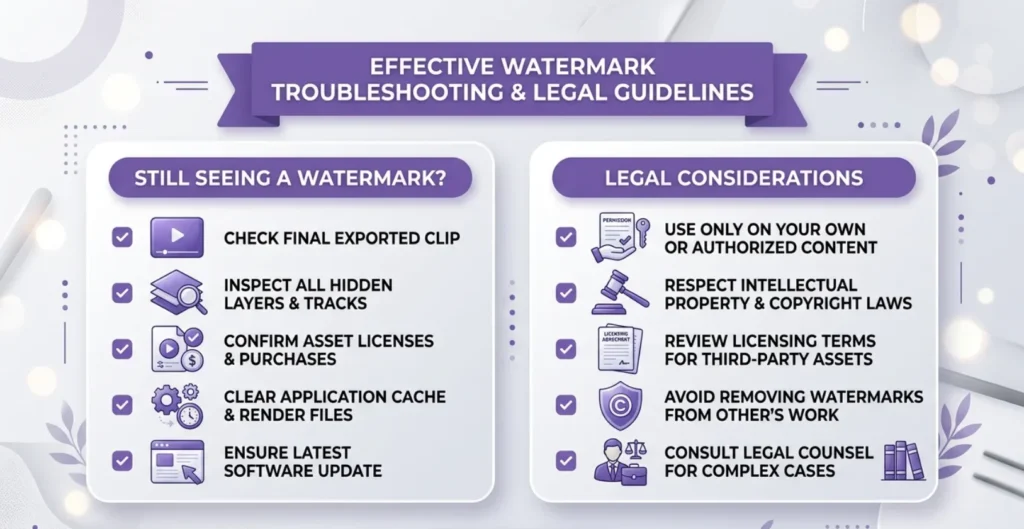
Legal Considerations
CapCut’s own AI watermark remover says it does not support removing watermarks from copyrighted or paid content you’re not authorized to edit, and that the feature is intended for personal or authorized materials only in CapCut’s usage limitation.
So here’s the simple version:
- Removing the CapCut ending clip from your own project is one thing.
- Removing watermarks from someone else’s protected content is another thing entirely.
Common Mistakes People Make When Searching How to Remove CapCut Watermark
After reviewing the SERP, official docs, and community complaints, the same mistakes keep showing up.
- Using AI Remove on a Normal Ending Clip: That’s extra work for no reason.
- Assuming Pro Removes Every Watermark Automatically: At least 2 active complaint threads show paid users still struggling with template-related watermark behavior in this CapCut thread and this VideoEditing post.
- Forgetting Hidden Template Layers: This is one of the biggest time-wasters.
- Trusting Outdated Workaround Hacks Too Much: Older-version tricks and export loopholes can stop working fast after updates.
- Treating Every Watermark Like the Same Problem: Ending clip, template branding, AI-generated label, and baked-in overlay are not the same thing.
Troubleshooting If the Watermark Still Shows Up
If you’ve tried the obvious fix and the watermark is still there, run this checklist:
- Did you go all the way to the end of the timeline?
- Did you delete the branded ending clip?
- Did you inspect every visible and hidden layer?
- Are you using a template with branded assets?
- Is the watermark actually baked into the footage?
- Did you preview before exporting?
- Are you relying on an old workaround instead of the official workflow?
Expert Guides & Data-Backed Insights Collection
- Most Popular App Statistics: Comprehensive data on top apps, users, and revenue
- AI SEO Statistics: Key statistics shaping AI-driven search and rankings
- Using Claude Code for Free: Complete guide to using Claude Code without subscription
- AI Astrology Predictions: Evaluating accuracy of AI-powered astrology tools
- Cheaterbuster AI Review: In-depth analysis of accuracy and real-world effectiveness
- Best AI Without Filter Chatbots: Detailed comparison of unfiltered AI tools and features
- Best Character AI Alternatives: Smarter, Less Restricted, and Way More Powerful Options
- AI Smart Glasses vs Privacy: Understanding data privacy in smart glasses
FAQs About How to Remove CapCut Watermark
How to remove CapCut watermark for free?
Can I save a CapCut video without a watermark?
Why is my CapCut exporting with watermark?
Can removing a watermark be illegal?
How to remove CapCut watermark on iPhone?
How to remove CapCut watermark on Android?
How to remove CapCut watermark without Pro?
How to Remove CapCut Watermark from a template?
How to Remove CapCut Watermark without losing quality?
Why do I still see a watermark even with Pro?
Final Verdict on How to Remove CapCut Watermark
If you want the cleanest workflow for How to Remove CapCut Watermark, use this rule:
- Delete the ending clip for normal exports.
- Inspect layers and replace assets for templates.
- Use AI Remove for watermarks inside the frame.
- Use crop, cover, export-selected-clips, or separate-timeline tricks only when the basic fixes don’t solve your specific problem.
- Consider older versions or watermark-free alternatives only if watermark issues keep interrupting your workflow.
That’s the version I’d trust if I wanted the watermark gone fast without ruining the video. And that’s really the point of this guide, not more hacks, just the right fix at the right time.


