
👉 Try MindtrixAI’s Free LLMs.txt Generator, AI Humanizer Tool & AI Paraphrasing Tool Now →
If I were starting from scratch today, I would not pay for a Claude subscription just to test whether Claude Code fits my workflow.
Anthropic’s pricing page shows Claude Pro at $20/month billed monthly and Max plans from $100/month, but the Claude Code docs also make it clear that the terminal workflow can work through Anthropic-compatible APIs instead of only the default paid route.
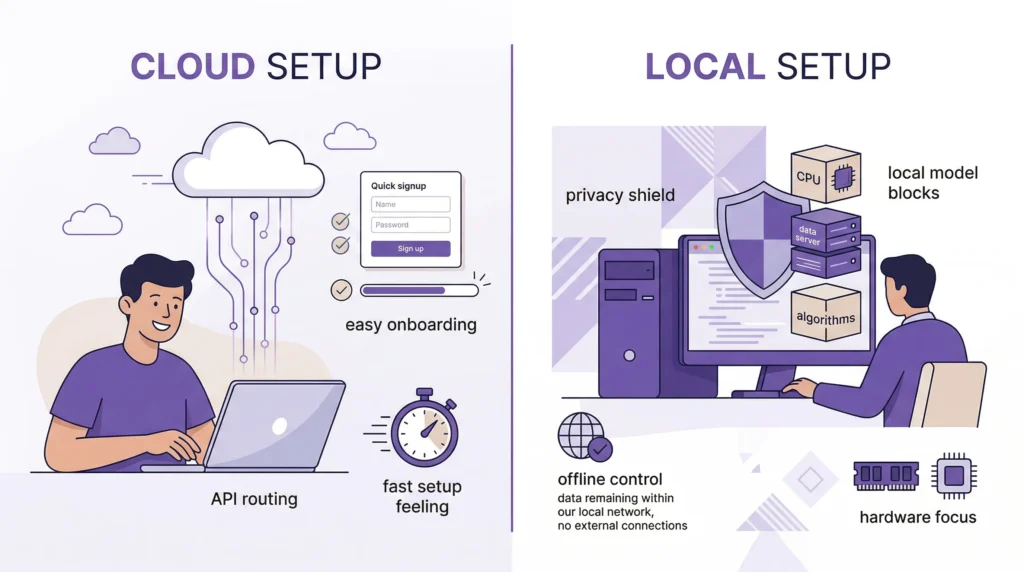
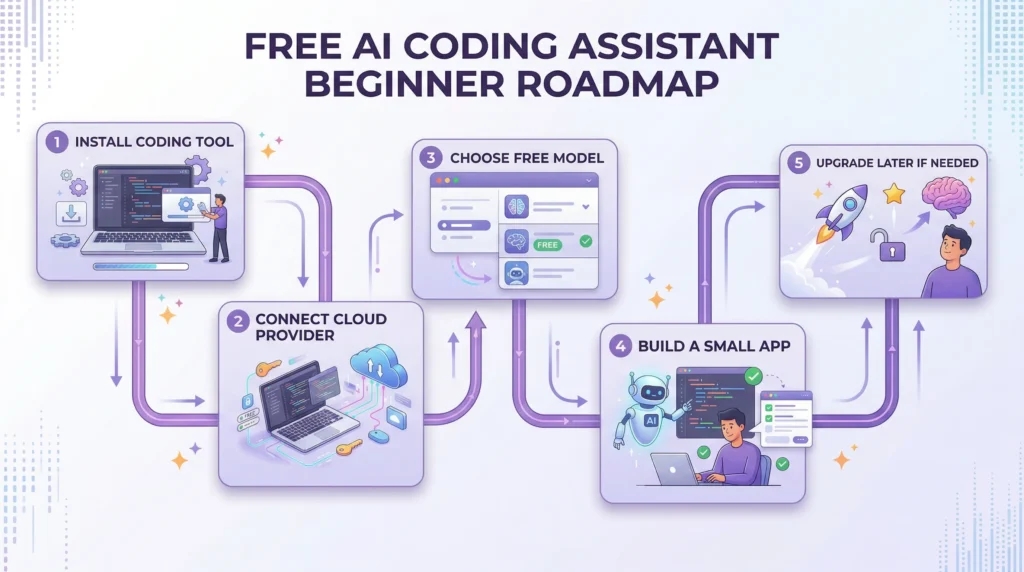
That is the key idea behind this how to use Claude Code for free guide. I keep Claude Code as the interface, then I swap the backend. For most beginners, that means using OpenRouter for free cloud models.
If I want more privacy or local control, I use Ollama. I’ve also corrected older setup advice so this version reflects the more current official docs.
- I can use Claude Code without paying Anthropic directly by connecting it to an Anthropic-compatible backend such as OpenRouter or Ollama.
- OpenRouter is the easiest beginner path because it offers free models and a Free Models Router for quick testing.
- Ollama is the better path if I want local control, privacy, or offline capability, but it needs more setup and enough memory.
- The official Claude Code command is
claude, not older variations likecloudorcl. - If I am brand new, the smartest roadmap is: start with OpenRouter, test small projects, then move to Ollama only if I need local control.
Can You Use Claude Code for Free? [Quick Answer]
Yes, not as “Claude Pro for free,” but yes, you can use Claude Code without paying Anthropic directly. Anthropic lists Claude Pro at $20/month and Max from $100/month, while the Claude Code CLI supports configuration with Anthropic-compatible APIs, which is what makes alternative setups possible in practice.
In practice, I have two realistic paths:
- OpenRouter for free or low-cost cloud models
- Ollama for local models running on my own machine
- Claude Code as the interface I actually use to inspect code, write files, and run tasks
If I am helping a complete beginner, I usually recommend OpenRouter first because it is faster to set up. If I care more about privacy, local control, or offline use, then Ollama becomes the better second step.
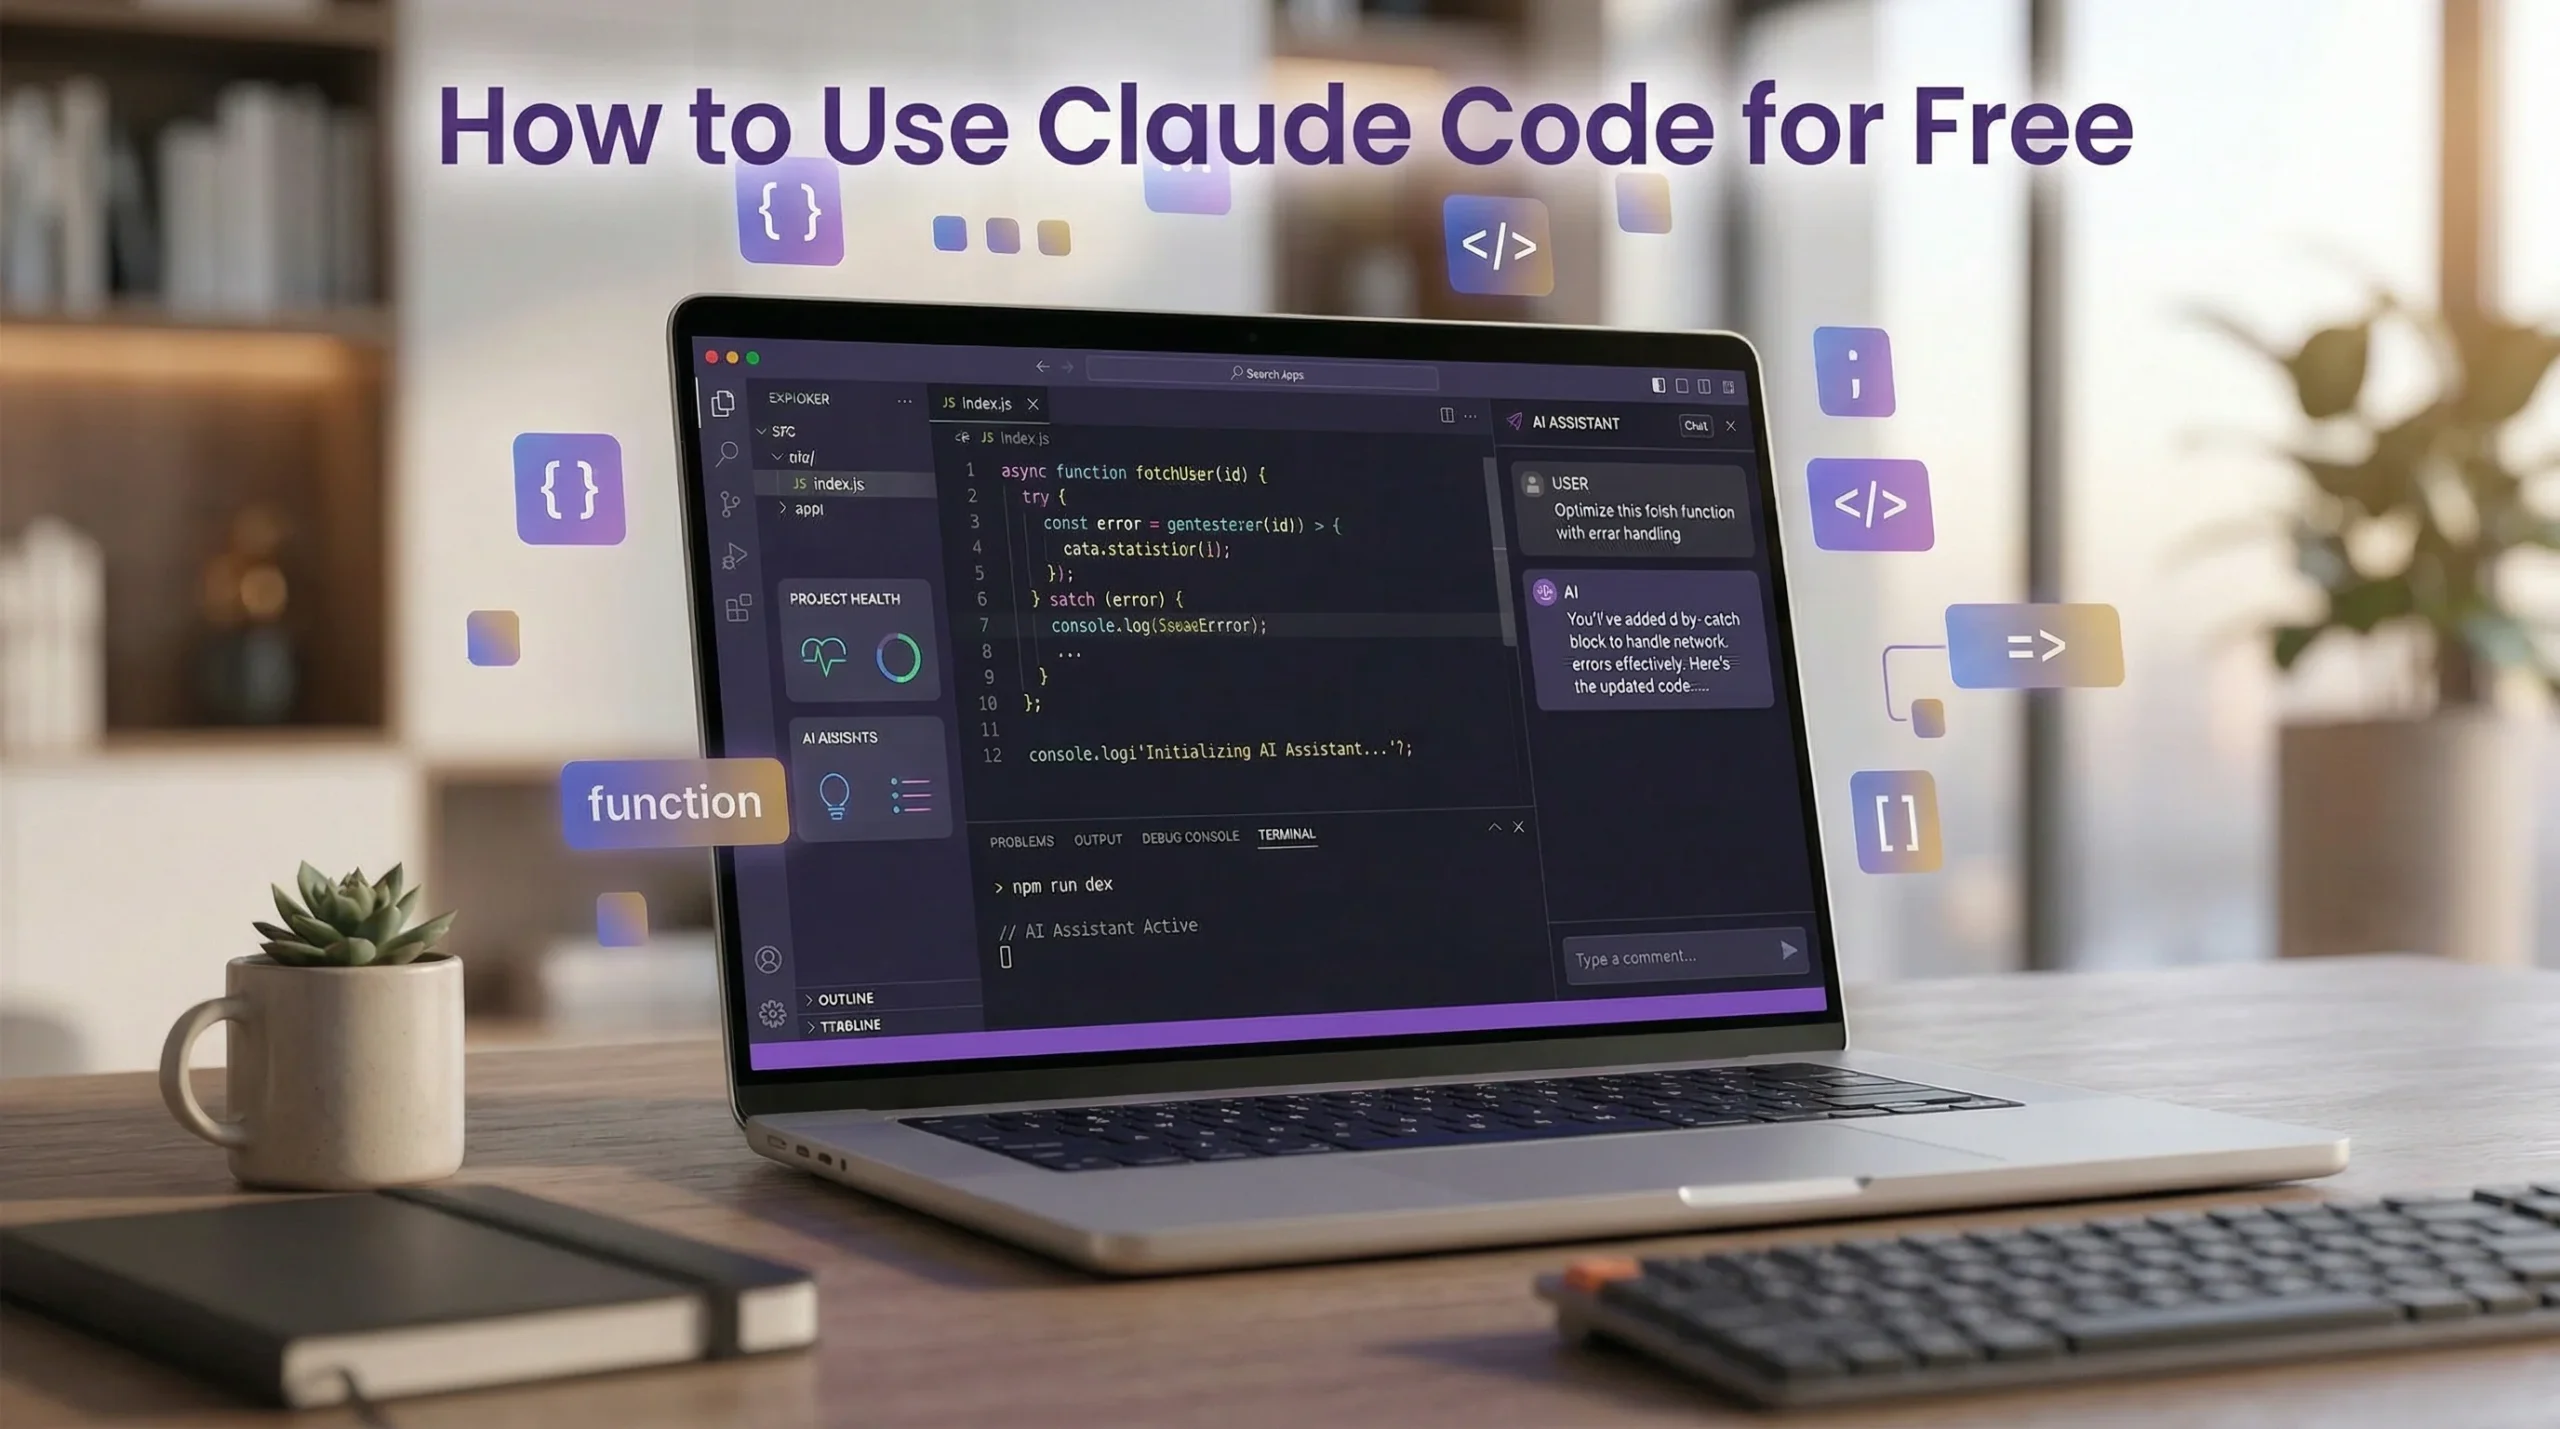
What Is Claude Code? [And How It’s Different from Claude AI]
Claude Code is Anthropic’s coding agent. Anthropic describes it as an AI-powered coding assistant that helps build features, fix bugs, and automate development tasks across a codebase, which makes it much more specific than a general chat assistant in the Claude Code overview.
Claude AI vs Claude Code
The easiest way I explain it is this:
- Claude AI is the broader assistant product
- Claude Code is the coding workflow built for terminal and developer tasks
That distinction matters because many people search for “Claude free” when what they really want is a tool that can read a repo, change files, and help build an app. Anthropic’s pricing page separates those experiences pretty clearly.
What Claude Code Can Do
Claude Code can do more than answer coding questions. Anthropic says it can edit files, run commands, and manage an entire project from the command line, which is why it feels more like a coding teammate than a chatbot in the official documentation.
Here are a few realistic prompts I would actually use:
- “Read this repository and explain how authentication works.”
- “Add a
POST /api/tasksendpoint with validation and tests.” - “Refactor this React component into smaller TypeScript components.”
- “Create a Python script that reads a CSV and groups totals by month.”
- “Build a simple to-do dashboard with local storage and filters.”
How Claude Code Works [Free Setup Explained]
The biggest thing I want a beginner to understand is this: Claude Code is the interface, not the backend model itself. In practice, Claude Code can work with Anthropic-compatible APIs such as OpenRouter and Ollama, which is why I can keep the same interface and change the provider behind it, as shown in OpenRouter’s Claude Code integration guide and Ollama’s Claude Code integration docs.
Claude Code Is Just an Interface
By default, Claude Code talks to Anthropic. That’s the paid path most people think of first. But once I understand that the CLI is really the front-end coding experience, the setup becomes much easier to reason about.
You Replace the Backend
That backend can be:
- OpenRouter for cloud-hosted free or low-cost models
- Ollama for local models on my own machine
OpenRouter says it provides access to 300+ models and providers, while Ollama documents a dedicated Claude Code integration through its Anthropic-compatible API in the OpenRouter models overview and the Ollama integration page.
In practice, this means I am not limited to a single model provider and can switch between free and paid models without changing my Claude Code workflow.
What You’re Actually Doing
What I’m really doing is redirecting Claude Code’s requests. Instead of sending requests to Anthropic’s paid endpoint, I point Claude Code to:
https://openrouter.ai/apifor OpenRouterhttp://localhost:11434for Ollama
That is the whole trick. Same coding interface, different backend.
Method 1 – How to Use Claude Code for Free with OpenRouter [Best for Beginners]
If I want the easiest path, I start here. OpenRouter says I can experiment with AI at no cost using its Free Models Router, which automatically chooses from available free models based on my request. For beginners, that removes a lot of setup friction right away in OpenRouter’s Free Models Router guide.
Why Choose This Method
I choose this method when I want:
- fast setup
- no local GPU dependency
- no huge model downloads
- an easier beginner experience
OpenRouter also notes that its free router can filter for capabilities like tool calling, image understanding, and structured outputs when available, which makes it much more useful than picking a random free model in the OpenRouter free-model docs.
Step 1 – Install Node.js
Node.js is not required for the official Claude Code install. I only care about it if I’m following older workflows, third-party tools, or extra workspace layers. If I do need it, the official Node.js site currently lists v24.14.1 (LTS) on the main download page, which I can get from the Node.js download page.
If I install it, I verify it with:
node -vIf all I want is the official Claude Code install, I can skip Node.js and go straight to the next step.
Step 2 – Install Claude Code CLI
This is the current official install path.
macOS / Linux / WSL
curl -fsSL https://claude.ai/install.sh | bashWindows PowerShell
irm https://claude.ai/install.ps1 | iexThen I start Claude Code inside a project with:
cd your-project
claude
That last command matters. If I see older guides using cloud or cl, I ignore them. The current official command is claude, exactly as Anthropic shows in the Claude Code overview.
Step 3 – Skip Claude Subscription
This is where OpenRouter becomes useful. Its official integration guide says I can connect Claude Code to OpenRouter instead of logging in with Anthropic directly. If I had previously signed in through Anthropic, I would run /logout first so the new config takes over properly, just as OpenRouter explains in its Claude Code integration instructions.
So yes, I can skip the Anthropic subscription here. I’m not unlocking paid Claude access for free — I’m using Claude Code with another compatible provider.
Step 4 – Create Configuration
The cleanest updated setup is through my shell profile, such as:
~/.zshrc~/.bashrc~/.config/fish/config.fish
That is what OpenRouter recommends in its integration guide.
export OPENROUTER_API_KEY="<your-openrouter-api-key>"
export ANTHROPIC_BASE_URL="https://openrouter.ai/api"
export ANTHROPIC_AUTH_TOKEN="$OPENROUTER_API_KEY"
export ANTHROPIC_API_KEY=""
Then I restart the terminal.
Step 5 – Add OpenRouter API Key
OpenRouter’s authentication docs say requests use Bearer tokens, and I can create a key at openrouter.ai/keys. I also like that OpenRouter lets me set an optional credit limit, which is a smart safety check if I decide to try paid models later, as described in the OpenRouter authentication docs.
My flow is simple:
- create an OpenRouter account
- generate an API key
- paste it into my shell profile
- restart the terminal
Step 6 – Select Free AI Model
If I want to stay fully free, I use openrouter/free. OpenRouter says the Free Models Router automatically chooses a free model based on the needs of the request, though free-model availability and limits can vary, as explained in the Free Models Router documentation.
If I want to pick manually, I look for models marked “(free)”. OpenRouter’s docs mention examples like:
- DeepSeek R1 (free)
- Llama models (free)
- Trinity Large Preview (free)
These official screenshots from OpenRouter are useful here because they make the “free model” step easier to follow visually.

Step 7 – Run Claude Code for Free
Once the environment variables are set, I go into my project folder and run:
claudeThen I verify the connection with:
/statusOpenRouter says I can also confirm activity from its dashboard, which is a great way to make sure I’m actually using OpenRouter rather than stale Anthropic credentials in the OpenRouter verification steps.
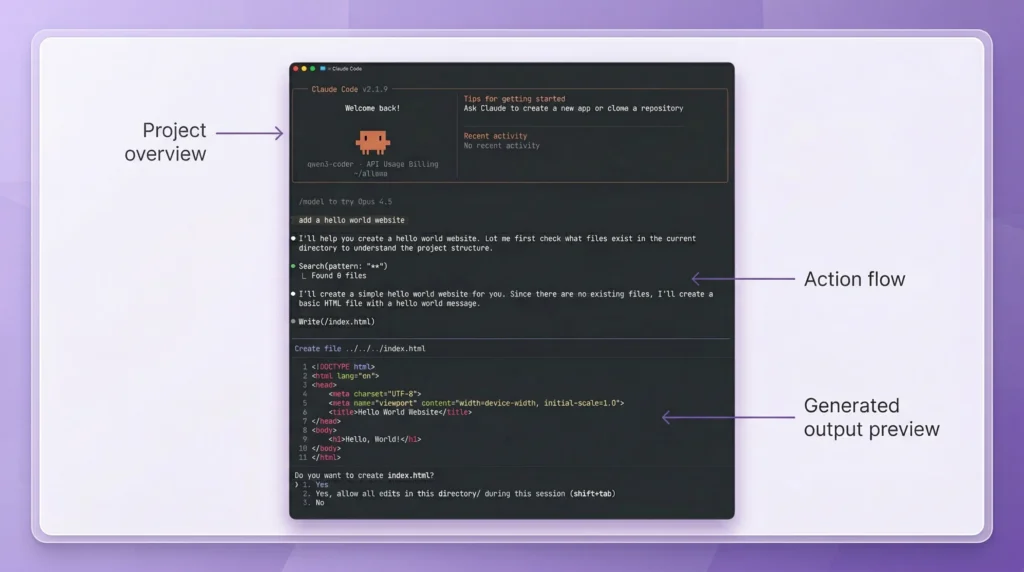
Example – Build an App with Claude Code
A simple beginner prompt I’d actually use is:
Create a modern to-do app dashboard with a sidebar, task form, filters, and local storage persistence.A stronger version is:
Create a responsive to-do app dashboard using plain HTML, CSS, and JavaScript. Add a sidebar, a task form, status filters, local storage persistence, and a dark mode toggle.If I want to test repo understanding instead of pure generation, I’d use something like:
Read this repository and explain where the API routes live, how authentication works, and which file I should edit to add a new endpoint.And if I want a backend test prompt:
Create an Express server with GET /health and POST /tasks routes. Validate that title is required and priority can only be low, medium, or high.Those prompts are much more useful than vague prompts because they give the agent enough structure to return something I can actually run.
Method 2 – How to Use Claude Code for Free with Ollama [Local Models]
If I want more privacy or local control, I use Ollama. Ollama says it runs on macOS, Windows, and Linux, and its official Claude Code integration works through an Anthropic-compatible API, as shown in the Ollama quickstart and the Ollama Claude Code guide.
Why Use This Method
I like this route when I want:
- local control
- less reliance on cloud billing
- better privacy for code
- an offline-capable setup
But I always add one warning here: Ollama’s context docs suggest that more complex coding tasks benefit from larger context windows (for example, 32k to 64k tokens), but the exact requirement depends on the model, task complexity, and available system resources.
Step 1 – Install Ollama
I install Ollama from the official site and test it with:
ollamaOn Windows, Ollama says it does not require Administrator rights, needs at least 4GB of space for the binary install, and models may require tens to hundreds of GB of additional storage, which is worth knowing before I commit to the local setup in the Ollama Windows docs.
Step 2 – Download Models
For a simple local-first test, I start with familiar models such as:
ollama pull mistralor:
ollama pull llama3.2Those are the kinds of local examples beginners can reason about more easily. For Claude Code specifically, Ollama’s integration page may reference models such as qwen3.5, glm-5:cloud, kimi-k2.5:cloud, and minimax-m2.7:cloud. However, these are not always available through a standard ollama pull workflow and may depend on specific integrations or cloud-backed configurations.
For a simple local setup, I stick with models that are widely available via ollama pull, such as mistral, llama3, or codellama.
Some experimental setups may include shortcuts like:
ollama launch claudeHowever, this is not part of the standard Ollama workflow and may not be available in most environments. For reliability, I use the manual environment-variable setup shown below.
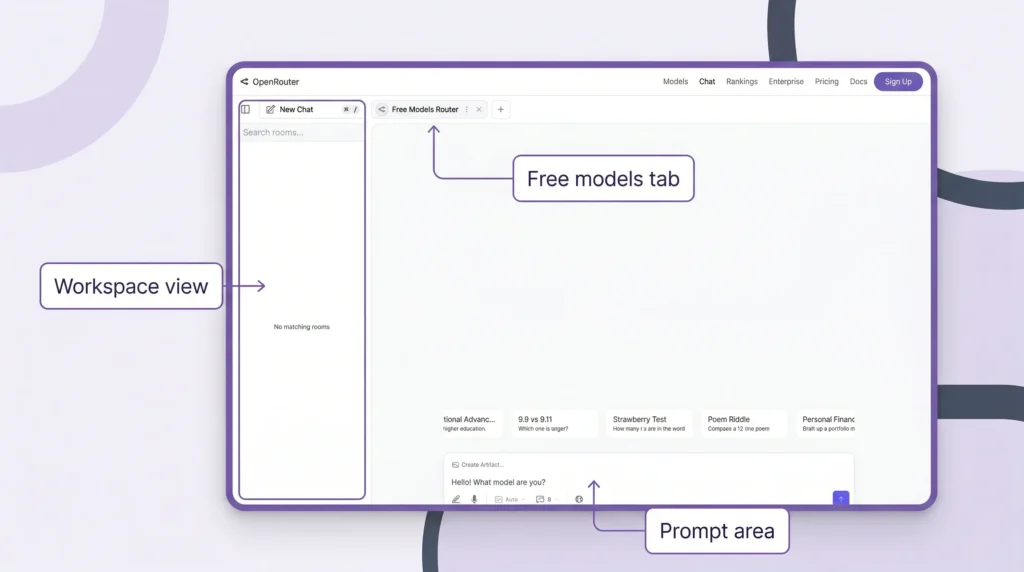
Step 3 – Install Popot (Optional AI Workspace)
If I want a more visual workspace, I can add a third-party layer like Popot. I want to be very clear here: Popot is a third-party workspace layer, not part of Claude Code itself. I see it as optional, especially helpful if I want a chat view, editor, shell access, and multiple sessions in one place, similar to what’s shown in this workspace demo.
If I only want Ollama + Claude Code, I can skip this completely.
Step 4 – Complete Required Setup
If I do use a workspace layer like Popot, I should expect extra setup such as:
- creating a GitHub repository
- generating a GitHub token
- granting repo permissions
- using a temporary HTTPS tunnel for testing
That makes this more advanced than the plain Ollama route, but it also gives me a friendlier UI once it’s working, as seen in the workspace install walkthrough.
Here are two GitHub-sourced visuals from the broader Claude Code routing/workspace ecosystem that help illustrate what these third-party layers can look like:

Step 5 – Connect Ollama to Claude Code
Ollama’s official manual setup says to use:
export ANTHROPIC_AUTH_TOKEN=ollama
export ANTHROPIC_API_KEY=""
export ANTHROPIC_BASE_URL=http://localhost:11434
Then I can run Claude Code with a model like:
claude --model qwen3.5That is the most explicit fallback path, and it’s the one I trust most when I want to know exactly what is happening.
Step 6 – Start Coding Locally
Before I blame Claude Code for anything, I verify Ollama is actually running. Two quick checks I use are:
ollama listand, if I want a simple server check:
curl http://localhost:11434Then I start small. My first prompts are usually:
Create a hello world script in Python and explain each line.Create a Node.js script that prints "Hello World" 10 times.Then I move up to something more practical:
Create a simple Flask API with a /health route and a /tasks POST route that accepts JSON.or:
Create a React component called TaskCard that accepts title, priority, and completed props and styles itself based on priority.That testing sequence helps me separate setup problems from model-quality problems very quickly.
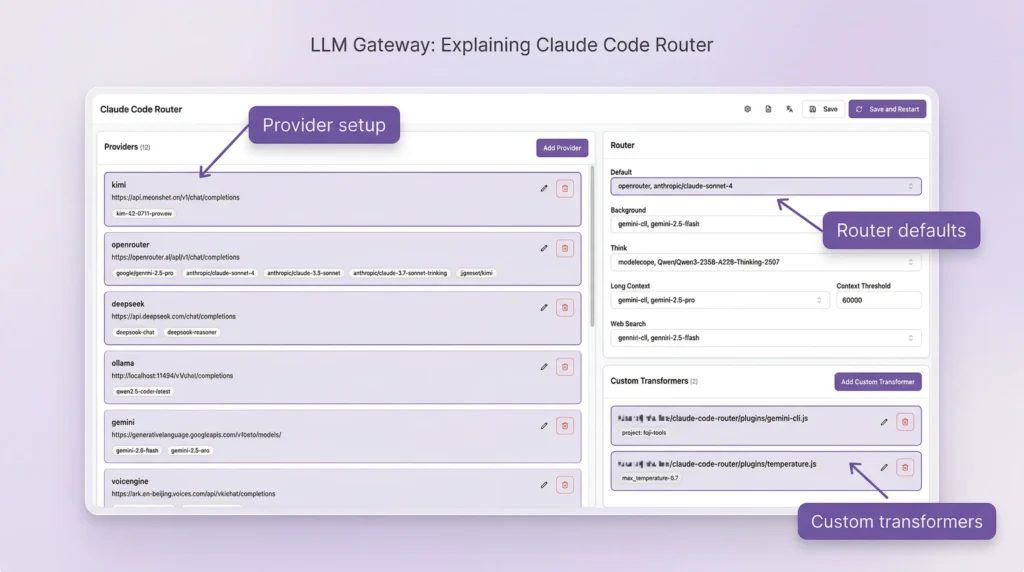
This official Ollama image is also worth restoring here because it visually reinforces that Claude Code integration is documented in the Ollama ecosystem:
Claude Code Interface Explained [Popot Workspace]
A workspace layer can make local AI coding feel much less messy. Instead of juggling terminal windows, files, and chat tabs separately, I get one place for chat mode, interactive mode, file editing, shell access, and session switching. That is the main appeal of a tool like Popot in the workspace demo.
Chat Mode [Beginner-Friendly]
Chat mode is where I tell most beginners to start. I can type what I want in plain English, let the coding agent generate or modify the code, and keep refining the result without feeling like I need to “speak terminal” first.
Interactive Mode [Advanced]
Interactive mode feels closer to the classic Claude Code workflow. Anthropic says Claude Code can edit files and run commands, and that deeper repo-aware control is what makes it so powerful for real project work in the Claude Code docs.
Built-in Features
A good workspace layer can give me:
- a file editor
- shell access
- file-change tracking
- multiple sessions
- smoother switching between chat mode and interactive mode
That combination is especially helpful when I’m learning how coding agents work in practice.
Chat Mode vs Interactive Mode
If I had to explain the difference in one sentence, I’d say this: chat mode helps me start, interactive mode helps me build faster once I’m comfortable. In workspace-style setups, I can often move between the two without losing the session, which is one of the nicest parts of that model in the workspace walkthrough.
| Feature | Chat Mode | Interactive Mode |
|---|---|---|
| Ease | Easy | Moderate |
| Control | Limited | Full |
| Best for | Beginners | Developers |
If I’m new, I start in chat mode. If I want more control, I switch to interactive mode. That learning curve is much smoother than forcing myself into terminal-only usage on day one.
Other Coding Agents You Can Use Instead of Claude Code
Claude Code is not the only option anymore. Ollama’s quickstart lists support for launching Claude Code, Codex, and OpenClaw, which shows how broad the coding-agent ecosystem already is in the Ollama quickstart.
Depending on what I want, I might also run into:
- Gemini CLI
- OpenAI Codex
- OpenCode
- PI-style coding agents
That matters because sometimes the smartest move is not forcing one agent into every use case. Sometimes it’s simply picking the one that fits my workflow and hardware better.
Free vs Paid Claude Code [Cost Comparison]
Anthropic’s pricing page shows Claude Pro at $20/month billed monthly and Max from $100/month, which is exactly why so many people look for a free or low-cost setup first on the Claude pricing page.
| Option | Cost | Performance |
|---|---|---|
| Claude Code with official Claude plan | Pro: $20/month, Max: from $100/month | Best overall |
| OpenRouter setup | Free to start with free models | Medium |
| Ollama local setup | Free software, hardware-dependent | Depends on PC |
| Low-cost API models | Small usage-based spend | Often strong for the price |
If I’m brand new, paying first usually isn’t the smartest move. Testing first almost always is.
Limitations of Free Claude Code Setup
Free setups are useful, but I don’t want to oversell them. OpenRouter says free models can have different rate limits and availability than paid ones, and Ollama’s context docs suggest that more complex coding workflows can benefit from larger context windows (for example, 32k to 64k tokens), but the exact requirement depends on the model, task complexity, and available system resources.
Slower Performance
Free and local models are often slower than premium cloud models. That’s normal. If I’m using a weaker machine or a smaller model, I expect more waiting and sometimes more retries.
Hardware Dependency
Ollama’s Windows docs say I need at least 4GB for the binary install, and models may require tens to hundreds of GB more. That alone can rule out the local route for some laptops, as the Ollama Windows documentation makes clear.
Lower Accuracy
Some free models are simply less reliable than premium ones. In practice, that usually means weaker code quality, more retries, poorer handling of long instructions, and worse performance on multi-file tasks.
One Hidden Gotcha: Context Length
This is one of the biggest practical issues. Larger context windows (such as 32k–64k tokens) can improve coding workflows, but the ideal value depends on the model, task complexity, and available system memory.
If I push it too high on the wrong setup, I can easily run into RAM or VRAM problems, as Ollama explains in the context-length docs.
If my setup and model support higher context lengths, I can experiment with values like:
OLLAMA_CONTEXT_LENGTH=64000 ollama serveBut I only increase this if my system has enough RAM or VRAM, since higher context sizes can significantly increase resource usage.
And to see what is actually allocated, I can use:
ollama psThat is one of the most useful technical checks I can run on a local setup.
Which Method Should You Choose?
If I had to give one honest recommendation, I’d say most beginners should start with OpenRouter. OpenRouter says it offers access to 300+ models and providers, which makes it much easier to experiment without dealing with GPUs, large downloads, or local context tuning on day one in the OpenRouter models overview.
Choose OpenRouter If
- I’m a beginner
- I want the fastest setup
- I don’t want to think about hardware
- I just want Claude Code working quickly
Choose Ollama If
- I want local privacy
- I want more control over models
- I care about offline capability
- I’m okay spending more time on setup
If I’m unsure, I start simple. It’s much easier to move from OpenRouter to Ollama later than it is to recover from an overly complicated first setup.
Is This Better Than Claude’s Free Plan?
Claude’s official free plan gives limited access through its web interface, but it does not provide the same level of control as Claude Code.
- The free plan is mainly for chat-based usage
- Claude Code is designed for full coding workflows, including file editing and command execution
- With OpenRouter or Ollama, I can use Claude Code without being locked into Anthropic’s paid tiers
If I want a full development workflow, this setup is significantly more flexible than the standard free Claude experience.
Hot Guides & Data Statistics
- Most Popular App Statistics: These apps are exploding in users and revenue
- How to Jailbreak ChatGPT: Learn Why Users Try to Bypass AI Restrictions and What Happens Next
- AI SEO Statistics: AI SEO trends quietly dominating Google rankings
- How to Remove CapCut Watermark: Remove watermarks instantly with this simple trick
- AI Astrology Predictions: Is AI secretly predicting your future already?
- Cheaterbuster AI Review: This AI might reveal secrets you weren’t ready for
- Best AI Without Filter Chatbots: Uncensored AI tools compared to know which one is the best for you!
- Top Character AI alternatives: These Alternatives Fix Everything Users Complain About
- OpenClaw Review: Agent that works 24/7 while you sleep!
- AI Smart Glasses vs Privacy: Security and privacy risks of AI eyewear
FAQs About How to Use Claude Code for Free
Is Claude Code free officially?
Is this method safe and legal?
Do I need coding knowledge?
Can I build real apps with Claude Code?
Final Thoughts on How to Use Claude Code for Free
If I were advising a beginner today, I’d say this: don’t let pricing stop you from learning the workflow. Anthropic’s paid plans start at $20/month for Pro and from $100/month for Max, but I can get surprisingly far with OpenRouter or Ollama before I ever need to pay, which is clear from the Claude pricing page.
There’s also a useful lesson from the wider AI-builder world here. One person building a model-routing product used Claude for things like landing-page copy, marketing ideas, and outreach, launched in about a week, and reported 4 organic signups before revenue showed up.
I think that’s a helpful reminder: when I’m still experimenting, I need affordable tools that let me keep testing ideas instead of worrying about every dollar, which comes through in this builder discussion.
- Start with OpenRouter + Claude Code
- Test with small, practical prompts
- Learn how the workflow feels
- Move to Ollama if I want more privacy or local control
- Upgrade only when I know exactly why I need the paid tier
That path is cheaper, less stressful, and much more beginner-friendly.


